Wednesday 17 February 2016

No Can Opener Required

I’ve always loved spaghetti hoops, I developed a strong dislike for baked beans during my primary school days, where eating everything served to you each lunch time was not a choice, neither was packed lunch. The force-feeding put me off them entirely and so the hoops in a can became my go-to toast topper. Served mouth scalding hot with black pepper and lots of grated cheese the humble tin of hoops has got me through many a hangover or broken heart. I’d sometimes go for alphabetti instead, just to mix things up a bit, in fact there’s probably a can or two in my cupboards now. When I saw alphabet pasta on a recent trip to Sainsbury I just couldn’t walk on by. Memories of my childhood, teens and later hungover university days rushed before my eyes and I grabbed a bag with glee. There’s something about that heady combination of carbs on carbs that I long for when having a bad day and hoops on toast was perfect for scratching that itch. It could also be on the table in less than 10 minutes, another point in its favour.
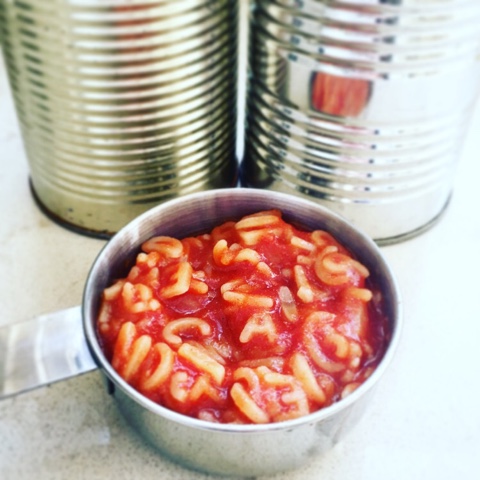
I definitely wanted to have a go at a homemade version of the classic Heinz alphabetti. A quick read through the ingredients was reassuring, the main ingredients were in fact pasta and tomatoes – this was promising. I think my version is pretty damn good, they even smelt like the real thing as I was simmering the sauce. The colour was good and from start to finish they were done in less than 15 minutes, plus no can opener required! They’d make a great packed lunch for kids (or adults) in thermos flask. Give them a try.

My second foray into the world of alphabetical food was an adaption of something I make regularly. I’m really fond of making a big batch of soup at the start of the week to keep me in lunches and the odd dinner through the week. It really takes the pressure out of meal prep and means I eat healthily even when I’m really busy. The soup uses up all my odds and ends from the fridge plus I’d buy some protein to add, usually from chicken or turkey, with stock and some small pasta shapes too. This way I was getting a good balance of veg, protein, fat and carbs in my meal, covering all bases. I decided to give my soup an alphabetical twist this week and here is the recipe for you to try. It’s as easy as A, B, C…Sorry I couldn’t resist.

It’s such a convenient way to consume most of your vegetables each day and a lot tastier than chewing through piles of plain veg. Adding the pasta is great for eating post training and thickens the broth a bit too. You could add rice, barley or quinoa as well to vary the flavours or make it gluten free. I've calculated the macros for you so you can make it fit your daily needs. 

Homemade tinned alphabetti
Makes 4-6 small servings
Prep 5 mins Cook 10 mins

2 tsp butter
1 tsp onion powder
3/4’s tsp paprika (sweet if you have it)
500g tomato passata
3 tbsp milk
3 tbsp grated Parmesan cheese
1 tbsp agave, soft brown sugar or Sukrin gold
150g alphabet pasta shapes

1 Heat the butter in a small pan, once foaming add the onion powder, paprika, sugar or agave and some sea salt (if not giving to children about 1 tsp). Stir until the mixture resembles a paste and tip in the pasatta, milk and Parmesan. Simmer for 5 minutes.

2 Heat a pan of salted water and once boiling cook the pasta for 5-6 minutes until tender, drain in a sieve or colander with small holes. Add to the sauce and serve.

Mega Macro Soup
Makes 6-8 portions  (Macros based on 6)
282 Kcals, 5.8g Fat, 27.8g Carbs, 24.7g Protein
Can be frozen

1 tbsp coconut or olive oil
½ bag diced frozen onions (I always use these now instead of chopping my own, why? I’m lazy, my mascara stays in tact, there cheap and convenient and the water means they don’t stick to the pan as they cook)
3 sticks celery, diced
2 large carrots, no need to peel, diced
1 large leek, trimmed and thinly sliced
2 courgettes, diced
150g mushrooms, diced
2 tsp garlic puree (again, this is due to laziness, I hate crushing garlic plus it’s so hard to get rid of the smell)
1 heaped tbsp. tomato puree & basil pesto
splash white wine
400g can chopped tomatoes
2 chicken (or veg) stock pots
a few bay leaves
450g chicken breasts or use a mixture of thighs and legs if you like the meat on the bone more, NB the broth will be a bit more fatty if you do this.
150g baby spinach
150g alphabet pasta or small pasta shapes
Parmesan rind (if you have one in the fridge) plus grated Parmesan or mozzarella to serve
1 tsp grated nutmeg
fresh basil, to serve

1 Heat the oil and a good pinch of salt in your biggest saucepan and add the onions, carrots, celery and leeks. Cook gently on a low heat until really soft, adding a splash of the wine or some water if they start to stick. This will take about 20 minutes.

2 Add the mushrooms, courgettes, garlic, pesto and tomato puree with some black pepper and cook for a few minutes more. Tip In the wine and simmer until almost evaporated then add the stock pots, bay, Parmesan rind if using, tinned tomatoes and 1200ml of water. Bring to a simmer then carefully add the chicken, use tongs to help you. Simmer gently for 20-25 minutes, depending on how big the breasts are, then remove them with the tongs and leave until cool enough to handle. Keep the soup simmering gently while you do this.

3 Tip the pasta into the soup and simmer for 6 minutes. Turn off the heat, stir and add the spinach, basil the nutmeg. Taste and adjust the seasoning now. Shred or slice the chicken and stir through the soup. Allow to stand for 5 minutes before serving with the fresh basil and grated Parmesan or mozzarella on top.


Monday 15 February 2016

Chocolate, Popcorn & Honeycomb Drizzle Cake


When you’re looking for a cake with the ultimate WOW factor then this is it! I made this bad boy for both of my brothers Birthday celebrations last week and it went down a treat. We took the cake out for dinner and it got so many great comments (and longing looks). Although on first glance the recipe looks pretty complex if you take each stage slowly and read through all the steps before you begin then it is really achievable, just don’t try to decorate it after a few glasses of Prosecco, I made this mistake and practically had to re-cover the whole thing the next day, massive FAIL. 

This cake has got quite a lot of elements, if you spread out the work over a few days it makes this easier to deal with. Bake the cakes up to 2 days in advance, cool then wrap well in cling film or freeze for up to a month. Make the honeycomb and popcorn the day before. It’s best to make the icing just before you use it as it makes it easier to spread. If you want to cheat a bit then buy ready made honeycomb and a bag of toffee popcorn! No one will know any difference and it takes the pressure off a little bit. 

I used my trusty, fool-proof chocolate sponge recipe and adapted the icing and the honeycomb from a BBC Good Food recipe for their Chocolate Honeycomb cake. I added the popcorn for an extra treat and it really did compliment the rest of the flavours so is well worth doing! Happy Baking.


Chocolate Drizzle Cake with White Malteser Frosting, Caramel Popcorn & Honeycomb.
Serves 20
Prep 1 hour 30 plus cooling Cook 50 mins

FOR THE CAKES
250g butter
250g light brown soft sugar
4 eggs
175g self-raising flour
75g cocoa powder
½ tsp baking powder
4 tbsp milk
pinch salt
FOR THE WHITE MALTESER ICING
250g pack slightly salted butter, softened
750g icing sugar
3 tbsp white maltesers hot chocolate powder (chocolate lumps sieved out)
1 tsp vanilla extract
280g tub full-fat cream cheese
FOR THE DRIZZLE
100g dark chocolate, finely chopped
75ml double cream
FOR THE CARAMEL POPCORN
100g granulated sugar
15g salty popcorn
FOR THE HONEYCOMB
100g golden caster sugar
3 tbsp golden syrup
1 tsp bicarb
37g pack Maltesers

1 Heat the oven to gas 4, 180°C, fan 160°C. Line the bases and the sides of 3 x 18cm (7in) loose-bottomed cake tins. In a stand mixer, or using a hand-held mixer, beat together the butter and sugar until pale and fluffy. Add in the eggs one at a time, then the milk and lastly mix in the flour, cocoa and baking powder.

2 Divide the batter between the prepared cakes tins (if you want to be precise weigh it, it was about 330g per tin) and bake for 25 minutes, or until risen and springy to the touch. Leave to cool in the tin for 5 minutes, before turning out onto a wire rack to cool completely.

3 Make the icing. In your largest mixing bowl, beat the butter with half the icing sugar, the maltesers powder (make sure you sieve it first to remove the white chocolate chunks) and vanilla until smooth. Add the remaining icing sugar and the cream cheese, and beat again until well combined – don’t over mix or the icing may become runny. I always cover my entire kitchen and self (and dogs) with a cloud of icing sugar when I do this, I try to avoid it but it never works out. Just embrace and clean after. 

4 For the caramel popcorn, melt the sugar in a heavy bottomed saucepan. Once you start to see pools of melted sugar, gently swirl the pan to encourage the rest of the sugar to melt. Using a wooden spoon, stir together and heat until all the sugar crystals have dissolved and the colour looks like runny honey. Take off the heat, stir in 2 tbsp water then put the pan back onto the heat to melt any clumps that have formed. Stir in the popcorn and pour onto a lined baking tray to cool.

5 Make the honeycomb. Grease a baking tray with a little oil. Put the sugar and golden syrup in a large pan. Warm over a medium heat and leave to bubble to a liquid caramel, but don’t stir. When you have a deep amber colour add the bicarbonate of soda and quickly stir into the syrup. Pour onto your oiled baking tray and leave to set for at least 30 minutes, or overnight.

6 Now for the fun part, building the beast. Remember guys; no Prosecco until after the cake is done!! Stick one of the sponges on a cake stand with a little of the icing. Use 1/3 of the icing to stack the cakes and choose your neatest one for the top, placing it flat side up. Next use a palette knife to roughly cover the entire cake with a thin layer. Don’t worry too much at this stage this is called a crumb coat and ensures that your final layer is crumb-free. Chill the cake for at least 30 minutes to firm up the icing.

7 Once the icing is chilled, use the remaining icing to completely cover the cake. This is easiest if you pile the icing on top of the cake, then use a palette knife to ease it over the edge and down the sides. Chill for another 30 minutes.

8 Make the drizzle. Finely chop or grate the dark chocolate and pop into a bowl and heat the cream in a small pan until just steaming. Pour the cream over the chocolate and leave to melt for 5-10 mins. Stir to make a glossy ganache, and then set aside to firm up a little. Pour into a piping bag.

9 Remove the cake from the fridge, snip the end of the piping bag, you want a thin controllable stream so don’t cut off too much. Pipe ganache over the edges of the cake, so it drizzles down the side, start at the back of the cake to get the hang of it. Fill in the middle of the top of the cake with chocolate too. Top with the popcorn, broken shards of honeycomb and malteasters, get creative here and just keep layering up, SERVE!


You can be rough with the icing at this point as the next layer will be for neatening! 


THIS was attempt number one...after Prosecco and with very old chocolate that had been in my cupboard for over a year, don't do it kids!! 


Wednesday 3 February 2016

Go Bananas

People often ask me “Don’t you ever just get sick of cooking”
My answer is always the same "nope!" If I’m particularly busy with work I can end up cooking around 10-12 different recipes in one day, when you take into account my own meals as well, but I never get tired or stressed with the cooking itself, maybe just with the cleaning up! In fact, I really miss it when I have less on my to do list, like today for example. Today is one of those rare days where I have small a break between the end of one project and the start of another. Instead of relishing the thought of a lazy day I found myself desperate for a project this morning. So on inspection of the fruit bowl and a quick glance in the fridge I decided to tackle a recipe for 'no refined sugar' banana bread.

I got introduced to Sukrin gold when my other half started doing the Body Coach 90 days shift, shape and sustain plan. The brown sugar alternative was used in a granola recipe included in the pack and I was really impressed with the results. It got me thinking about what else it could be used in, and I was keen to try it out in some baking recipes. I thought it would be ideal for a version of the highly popular banana bread. The over ripe bananas are deliciously sweet anyway so I thought it would be a perfect base to begin my exploration with. I’m using coconut oil instead of butter, adding some whey protein and flax seed in place of some of the flour and switching to wholemeal flour. All in all a pretty healthy bake!

I’ve been sticking to my healthy diet quite religiously of late and in the last couple of days I’ve been craving something sweet. I’m not someone who usually has a sweet tooth but who am I to argue with what my body clearly wants. Although I have to draw the line somewhere as if I listened to it too much I’d end up eating pizza for breakfast, lunch and dinner some days. I thought this recipe could kill two birds with one stone; satisfy my stomach and my cooking itch.

The best thing about this banana bread? Other than the taste of course, it actually gets better as it gets older, so makes a great breakfast or afternoon tea for a good few days after you’ve baked it. However this removes any excuses you might make just to eat it all in one go…bugger!! 

I’ve even worked out the macros for you too, so you can easily incorporate a slice or three into your daily food intake….I know - there’s no end to my kindness is there.

If you cut the loaf into 10 slices then each one (un-iced) contains:

19.4g Carbs 10.7g Fat 9.1g Protein 207 Calories

Protein Banana Bread with Lime & Yogurt Icing
Cuts into 10 slices

150g plain wholemeal flour
2 scoops banana whey protein
1 tbsp chai and flax seed mix
1 tsp each bicarbonate or soda and baking powder
½ tsp salt
90g coconut oil, melted
140g Sukrin gold brown sugar substitute (get it from Amazon, Tesco or Holland & Barrat)
3 large or 4 small really ripe (black) bananas – the riper the better here. I tend to store them in the freezer until I have enough black ones, and then defrost them for an hour before using them
80g full fat Fage Greek yogurt
1 tsp vanilla extract
3 medium eggs
FOR THE TOPPING
90g full fat Fage Greek yogurt
Zest and juice from ½ lime
1 tbsp Sukrin gold brown sugar substitute
about 10 dried banana chips

1 Heat oven to 180C/160C fan/gas 4. Line a 2lb loaf tin with a loaf tin liner or long strip of baking parchment. Put the flour, flax seed, salt, whey protein, baking powder, bicarb and sugar into a medium bowl.

2 Using a stick blender blitz half of the bananas, the eggs, vanilla and yogurt until smooth. Mash the other half of the bananas and add to the mix with the melted coconut oil. Whisk to combine. Tip into the dry ingredients and quickly fold together using a large metal spoon. Don’t over work the mixture, work quickly using as few folds as you can or the bread will become tough.

3 Pour into your lined tin and bake for 45-55 minutes, until golden brown and a skewer inserted comes out clean, cook for a further 5 mins if the skewer comes out sticky. Cool on a wire rack. Meanwhile beat the yogurt, lime juice, zest and sugar until combined. Once the cake is fully cooled spread over the topping then cut into slices to serve with extra yogurt and blueberries, if you like.


Thursday 14 January 2016

Skinny Pad Thai

Skinny Pad Thai

I feel I need to start by saying this recipe is by no means authentic. I probably shouldn’t even be calling it a Pad Thai but hey that’s the beauty of freedom of speech. It is a great, tasty way to pack a lot of vegetables and lean protein into your midweek meals.

In Asia Pad Thai is usually served from street-food vendors or at casual restaurants and has become a very popular British take-away.  You’ll often find it served with chicken or prawns but tofu is actually the traditional ingredient used to make Pad Thai in Thailand. The dish is a massive crowd pleaser – in fact I’ve yet to encounter anyone who isn’t a fan – I think it’s due to the balance of flavours. It feels fresh, slightly sweet with just a dash of spice. It can however, if done badly, be greasy and stodgy.

Here’s why I love my version; It’s really tasty, pretty quick, filling and you feel like you’re eating something a bit naughty, even though you’re not, it’s less than 350 kcals per portion and the portion is big, which I like! The prep is the longest part, once you have everything ready the dish can be cooked from start to finish in about 10-12 mins. You don’t have to use zero noodles, rice noodles would be much more authentic yet slightly less skinny, or you could use the ever trendy courgetti . I find zero noodles are a good method to trick my brain into thinking I’m eating carbs, when I’m not, in a way that courgetti doesn’t quite manage. I don’t have anything against carbs but I do find I become bloated if I eat too many so I tend to cut them out in the week and then enjoy them at the weekend. If using noodles choose medium rice noodles and soak them in boiling water for about 10 mins before you start cooking, then drain and use as directed below.

The trick for speedy cooking is to get everything ready before you start. So chop all your veggies and have them in bowls or piles on a plate or board. Get your sauce mixed and soak and drain your noodles. This way the cooking will be really simple and the veg will stay nice and fresh and wont overcook while you chop like a maniac.

Skinny Pad Thai
Serves 2
This makes a good next day lunch for work too so even if there’s only 1 of you eating I’d make the whole batch and pack any leftovers up in a  tuppawear. 

1 whole egg and 2 egg whites
1 lime
1 tsp tamarind paste
1 tbsp sweet chilli sauce
1 tbsp ketchup (KETCHUP??! Pad thai contains quite a lot of sugar, by using ketchup you can leave out the sugar and still get the sweetness along with some flavour as well)
1 tbsp Shaoxing Rice wine, Sake or Sherry 
2 tbsp light soy sauce (or if you have fish sauce already use 1 tbsp fish sauce and 1 soy sauce)
2 tsp coconut or olive oil
15g coriander leaves or chives
1 tbsp salted peanuts (optional)
1 large chicken breast or 250g tofu
200g raw peeled prawns
6 spring onions
200g beansprouts
3 baby Pak Choi
1 tbsp ginger and garlic puree
About 100ml chicken stock
Pouch zero noodles, drained and rinsed (Holland & Barrett, Morrison, Waitrose)
Fresh red chilli, to serve, optional

1 Mix together the sweet chilli sauce, ketchup, the juice from half of the lime, the tamarind paste and most of the soy sauce or fish sauce & rice wine leaving about 1/4 a tsp of each. Slice the spring onions finely on the diagonal, separating the white and the green parts. Roughly chop the coriander and peanuts. Roughly chop the stems of the pak choi leaving the leaves whole. Slice the chicken into bite size strips and drizzle with a little more soy sauce and some black pepper. Have the stock next to your pan, adding this while cooking stops the dish drying out without adding too much oil.

2 Beat the egg and egg whites with some black pepper and the reserved soy and rice wine . Brush a large non-stick frying pan with some of the oil, on a medium/high heat. Pour in the eggs and move the pan so they spread out in a thin, even layer, scatter on a few herbs. Cook for about 1 minute, until set, then tip out of the pan onto your chopping board and roll up like a pancake, then slice into strips. Set aside.

3 Use a high heat to keep the cooking quick. Wipe the pan out if you need to, if not add half the remaining oil along with half of the ginger & garlic pure, cook for 15 seconds while stirring then add chicken and a small spoon of your sauce. Fry until golden brown adding a splash of stock if you need to, then chuck in the prawns with a little more of your stock. Toss for 1-2 minutes until the prawns are firm and pink and the chicken is just cooked through. Tip into a bowl to set aside.

4 Add the last of your oil and ginger & garlic puree then tip in the white parts of the spring onions, beansprouts and cabbage with another splash of stock. Cook for 1-2 mins, until just wilted with a little crunch.

5 Add the noodles, most of the spring onions and the sauce you mixed earlier and toss so everything combined and is coated evenly. Using metal tongues will make this easier, Return the egg, prawns & chicken and mix well, add the pak choi then heat through then stir in most of the coriander and divide between bowls. Garnish with the chilli and nuts (if using) and the reserved green spring onions and herbs, with the other half of the lime cut into wedges for squeezing over. 


Approx. per serving: 344 kcals, 7.1g fat, 47g protein, 16g carbs